Tuesday, June 28, 2011

Poppies

Don't you love it when a card comes together super fast. That's how this one was. It took me all of 10 minutes. It helped a ton that I had already colored the image days ago and all I needed was some finishing touches. The image is from Heart Song Designs called, Poppies. I colored them with Copics and used a couple of lacy Nesties to help frame them.

Still no word on travelling to go get Makaio, but our paperwork is progressing. It has not been easy, this last phase of waiting, to say the least, but I know once that little bundle is in my arms it will all be forgotten. Keep praying for us....oh, and one major decision we've made is that I will be travelling alone to go get him. There are lots of reasons why this just makes more sense and seems right, and honestly I'm really excited about it. It will be my third time to Ethiopia...let me tell you, never in my wildest dreams did I ever imagine going half way around the world for my kids. But, I wouldn't change a thing either...or I wouldn't have MY kids. God is good, and faithful, He will finish this work He's started. I'll keep you posted! Hugs....

Saturday, June 25, 2011

PTI Blog Hop


This is my first PTI blog hop! The challenge this month is really fun, it's a gorgeous inspiration photo that totally reminded me of my daughter, princess all the way. I wanted to focus on the little dress up dresses in the photo and make a fluffy flower using tissue paper and the Mehindi Medallion stamp set. I  am really pleased with how it came out and put together a little tutorial for you if you'd like to make your own flower. Let's get started:)

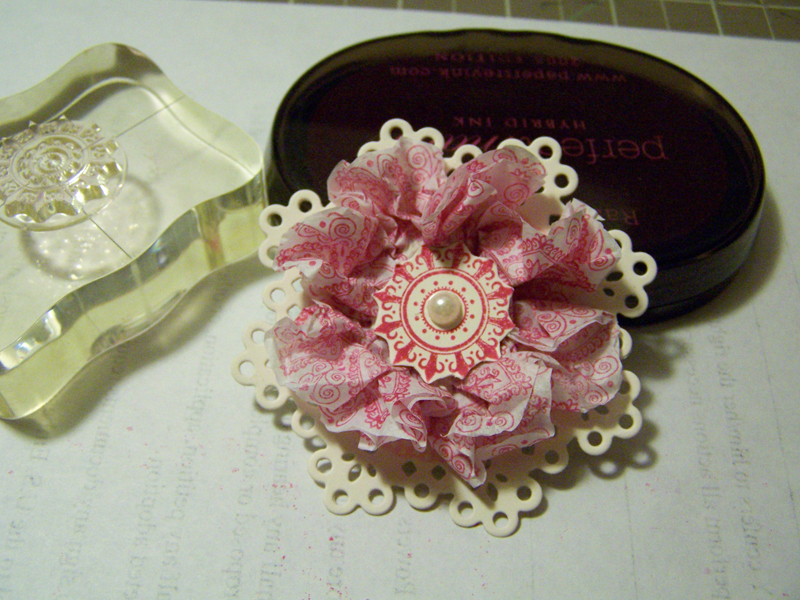
First you stamp the largest medallion onto white tissue paper. It doesn't matter if the tissue paper is flat or wrinkled as you are going to wrinkle it for the petals. I used Raspberry Fizz ink and stamped 8 medallions to make my flower. After you stamp them all, you trim them out as closely as you can.

After they are all trimmed out you will be working with them one at a time, so one medallion equals one petal. Fold the medallion in half, you want to be sure the creased bottom is facing down.

Next, you are going to fold it in half again, but it's kind of more like pinch it in half. Keep some space between the two outside corners for the next step.

You are going to take those two outside edges in the prior step and fold them back and pinch them together, holding them in place.

You are then going to turn the petal toward you so the pinched edges you are holding face behind and you have formed a petal. You can kind of pinch the bottom of the petal together and fluff out the middle, since it's tissue paper it is very easy to get it to mold to what you want.

To attach the petals and start forming your flower I cut a Doily Details and used Scotch quick dry glue to glue them down. Again, since it's tissue paper the wet glue works really well and sticks right away. I positioned my petals so that the scalloped edge of the die still shows adding to my finished flower. You glue all the petals down in the same way.

Once I had all my petals glued down I wanted to add a center. You will too as it doesn't look very pretty with all the petal ends showing ;) I stamped one of the smaller medallions onto some cream cardstock and trimmed it out and with a pop dot adhered it to the middle. To finish my flower I added a pearl.

I hope you enjoyed this little tutorial, if you did I'd love to hear from you! Thanks so much for stopping by:)


Thursday, June 23, 2011

Baby Onsie and Card


For my project I really wanted to try the Viva Decor Pearl Pen on some fabric, so I decided to make a little baby gift. I took a plain white onsie and stamped the moon and star in Palette ink. Then I stamped the sentiment from the Baby Love stamp set from Pink By Design. I heat set the ink so that it can be washed. Then I added the Viva Decor Pearl pen to the moon in silver and the star in gold. After about 45 minutes it was dry and so cute with the little bit of shine and demension it adds. I wanted to have a matching card, so using the Create a Critter cartridge I cut the moon at 3 1/2" and the star at 2 1/2". I used some 1/4" Scor Tape for the glitter strips. All you do is cut a length of tape, take off the paper and sprinkle the glitter on, remove the excess and you have perfectly dry, stuck glitter in no time :) I accented the moon and stars using the Viva Decor Pearl Pen again. I hope you enjoyed this project, I had fun making it! Be sure to check out Scrapbook Pal and remember, they offer free shipping on any order over $25!

Wednesday, June 22, 2011

Makaio's Announcements

In an effort to stay busy during this super hard wait to bring my baby boy home I finally felt a break through of peace that God is here with me and will finish what He started. I realized that I have been demanding my gift, and that's just not how gifts work! After all, the very name we chose for him means "God's gift."  I need to let Him give me Makaio in His perfect time. So, I made his announcements :) Felt really good...I'd had this idea in my head for awhile now, used some PTI goodies and I googled how many miles it is from our home to the captial of Ethiopia, Addis Ababa, where my boy is. Wow! is all I can say... Priceless pretty much sums it up.

The picture quality is not great, but this was taken mere minutes after getting to meet him. Soon he will be mine...always. hugs.....

Sunday, June 19, 2011

Bookmarks

 I wanted to make a little gift for a dear friend of mine and she loves to read, so I finally played around with the bookmark die and stamp set, All Booked Up from PTI. I really love how these came out and I hope she will too :) I love all the friendship sentiments in the set, so each one has a sentiment about being friends, which made the gift that much more meaningful. I colored the one image with Copics and on the other two just outlined a part of the border. I used some various background stamps as well and added some pretty toppers. I hope you like them, I'm excited to give these to her. Hugs...

Friday, June 17, 2011

Tuesday Throwdown Hop!

Welcome to the blog hop that the Tuesday Throwdown challenge blog has been doing all week! Today I have a card to share using one of the cute digis from Digital Delights.


I decided to go a bit unconventional with this image and make it a baby card. I colored the image with Copics and added some fun touches.


Would you like a chance to win a great prize from Digital Delights? All you have to do is leave a comment right here and I'll pick a winner :)

Monday, June 13, 2011

TT-One Year Celebration!

Welcome to this week's Tuesday Throwdown! It's a special week as we celebrate our 1 year anniversary! All week we are having a DT blog hop and you have the chance to win some great prizes just by visiting each blog and leaving a comment. Today my card features this cute balloon fish image from Whimsy Doodles. I colored the image with Copics and I chose 3 past TT challenges, polka dots, buttons and use of a die cut. I hope you will come celebrate with us this week and be sure to stop by here on Friday for your chance to enter for the hop prizes I have to offer. Thanks for stopping by!

Tuesday, June 7, 2011

5 Years


This month we got to play with the Viva Decor Pearl Pen! What a fun product :) I love how easy it is to use and the really cool thing is that there is no tapping it down from the back of the paper to get a perfect dome shape. I decided to use it on my son's 5th birthday LO which was great to have a fun new embellishment that can be very boyish.

For my LO I used the Boy Will Be Boys cartridge and cut the title at 4" using the arrow font for the number 5 and the block font for the word "years". After assembling the LO I used the Viva Decor Pearl Pen in Red to create a faux star embellie on the car and to liven up my title. For the letters I simply squeezed out the size dot I wanted and had nice shiney domed embellies! The other great thing about these pens is that it doesn't take ages for it to dry, my dots and star were dry in just about 1/2 an hour.

These pens also work on fabric, so I plan on playing with that a bit for my next project, think baby onsie:) Thanks for stopping by and be sure to check out Scrapbook Pal for all the new fabulous products they have and get free shipping on any order $25.00 or more!

Monday, June 6, 2011

Makaio Aron

Here is our sweet, sweet boy. I got the okay to share his picture....thank you for all the continued prayers and support....soon and he'll be in my arms forever:)


Saturday, June 4, 2011

Popping in to say hi!

Hi :)  We got home safely from Ethiopia and I am just having a hard time adjusting back to a normal routine, especially feeling normal. I just haven't had it in me to craft yet, though I want too, but trying to switch back to my time zone is hard after adjusting to being 10 hours ahead.

 Some wonderful news to share though, Friday we received the long awaited news that our adoption has been finalized and that our baby boy is officially ours! I am pretty sure that I can share his picture, but I am confirming with my case manager before I put his adorable face up for the world to see ;) It's good to be home, but I honestly can't wait to go again because next time he comes home and we are finally done with this process!! They tell us 6-8 weeks, but I am praying and hoping for sooner. Thanks for all the prayers and good thoughts, keep them coming....we are so close to having our little one home. I'll share a picture as soon as I'm sure it's okay:) hugs...