 A little Christmas card today! I finally got to try some Glimmer Mist!! So much fun, but be sure to cover up your work space because wow, does it spray everywhere! I started by spraying my Peacock color Glimmer Mist onto heavy white cardstock, I wanted to give it the feel of snow. After I let it dry I had to flatten the paper out a bit and then I stamped directly on top of the misted paper and built my little scene using the Snag 'em stamp set Stocking and the bird from the Prima Wings stamp set. I also used some pretty shimmery SEI paper and Prima trim. I looked in my stash the other day and discovered I have quite a few Christmas cards already done! What about you? Be sure to hop on over to pick up some fun supplies for all your holiday crafting at Your Memories Here. Hugs....
Sunday, October 31, 2010
Christmas card
A little Christmas card today! I finally got to try some Glimmer Mist!! So much fun, but be sure to cover up your work space because wow, does it spray everywhere! I started by spraying my Peacock color Glimmer Mist onto heavy white cardstock, I wanted to give it the feel of snow. After I let it dry I had to flatten the paper out a bit and then I stamped directly on top of the misted paper and built my little scene using the Snag 'em stamp set Stocking and the bird from the Prima Wings stamp set. I also used some pretty shimmery SEI paper and Prima trim. I looked in my stash the other day and discovered I have quite a few Christmas cards already done! What about you? Be sure to hop on over to pick up some fun supplies for all your holiday crafting at Your Memories Here. Hugs....Thursday, October 28, 2010
Elegant Snowflake
 This week's SCS sketch was a fun one so I played along and am sneak peeking a new Sweet 'n Sassy set coming out next month called Snowflake Silhouettes. Aren't those pretty? I stamped my focal snowflake in white ink and then outlined it with a white gel pen so it stood out better. A bit of rhinestones and ribbon and I was done:) Hope you are having a fabulous week!
Tuesday, October 26, 2010
TT#23- Sentiments
 This week's challenge at the Tuesday Throwdown is to use a sentiment as your main focus. My card is also a sneak peek of a new set called Wait on the Lord coming out next month from Sweet 'n Sassy stamps. Not only do I love this verse, I love the beautiful font and that is is sized generously to easily serve as the focal point. I added some dry embossing, faux stitching and made a few wire ribbon roses with pearl centers and finished it off with some punched butterflies. I hope you'll hop on over and join us this week!
Monday, October 25, 2010
Ten Minute Christmas Gift Tags
 Hello! A fun but super quick project for you today, 10 minute Christmas gift tags! To make these little babies is not only SUPER cheap, but easy! I first started by cutting out 8 tags with my Cricut from white cardstock. Then I used the cute Stocking Set Snag'em stamp set that is only $1.00 from Your Memories Here! I just stamped each image in colored ink, added a "to/from" stamp to the back and then added some Stickles to give each tag a bit of sparkle. These are a great project to get a head start on for your own gift giving or they would make a nice little just because gift for someone else to use for the upcoming holidays. Have a great day!
Saturday, October 23, 2010
Paper Magnet Fun!


I wanted to make my son some fun magnets and the perfect cartridge for this is the Boys Will Be Boys Cricut cartridge! These went together very quickly too and would make a great gift or a fun party favor too:) Here's how I made mine.
For the box I used the Tags, Bags, Boxes and More cartridge and cut out the Nut cup on page 130 with the fit to page option on.
Then, using the Boys Will Be Boys cartridge I cut the Race Car on page 68 at 3" with all options selected to create my layers. Once with just the car selected, then with shift, then with layers. I did this twice, once for the front of my box and once for a magnent.
I then chose the Dump Truck on page 29 and cut it at 3" using all the above selections.
I then cut the trike on page 36 at 3" with all the above selections.
Last, I chose the Car cut on page 61 and cut it at 2" with all the same selections.
I then embossed layers of the vehicles using my Cuttlebug and Argyle embossing folder, Spots 'n dots folder and the Polka Dots embossing folder. For the red detail on the tike cut I used a Sakura red glaze gelly pen.
I then adhered everything together and attached some self adhesive magnet strips that I cut to size to the back of each vehicle and packaged them all up in the box. My son has had a lot of fun with them! I hope you try it out for yourself:)
Friday, October 22, 2010
Mums
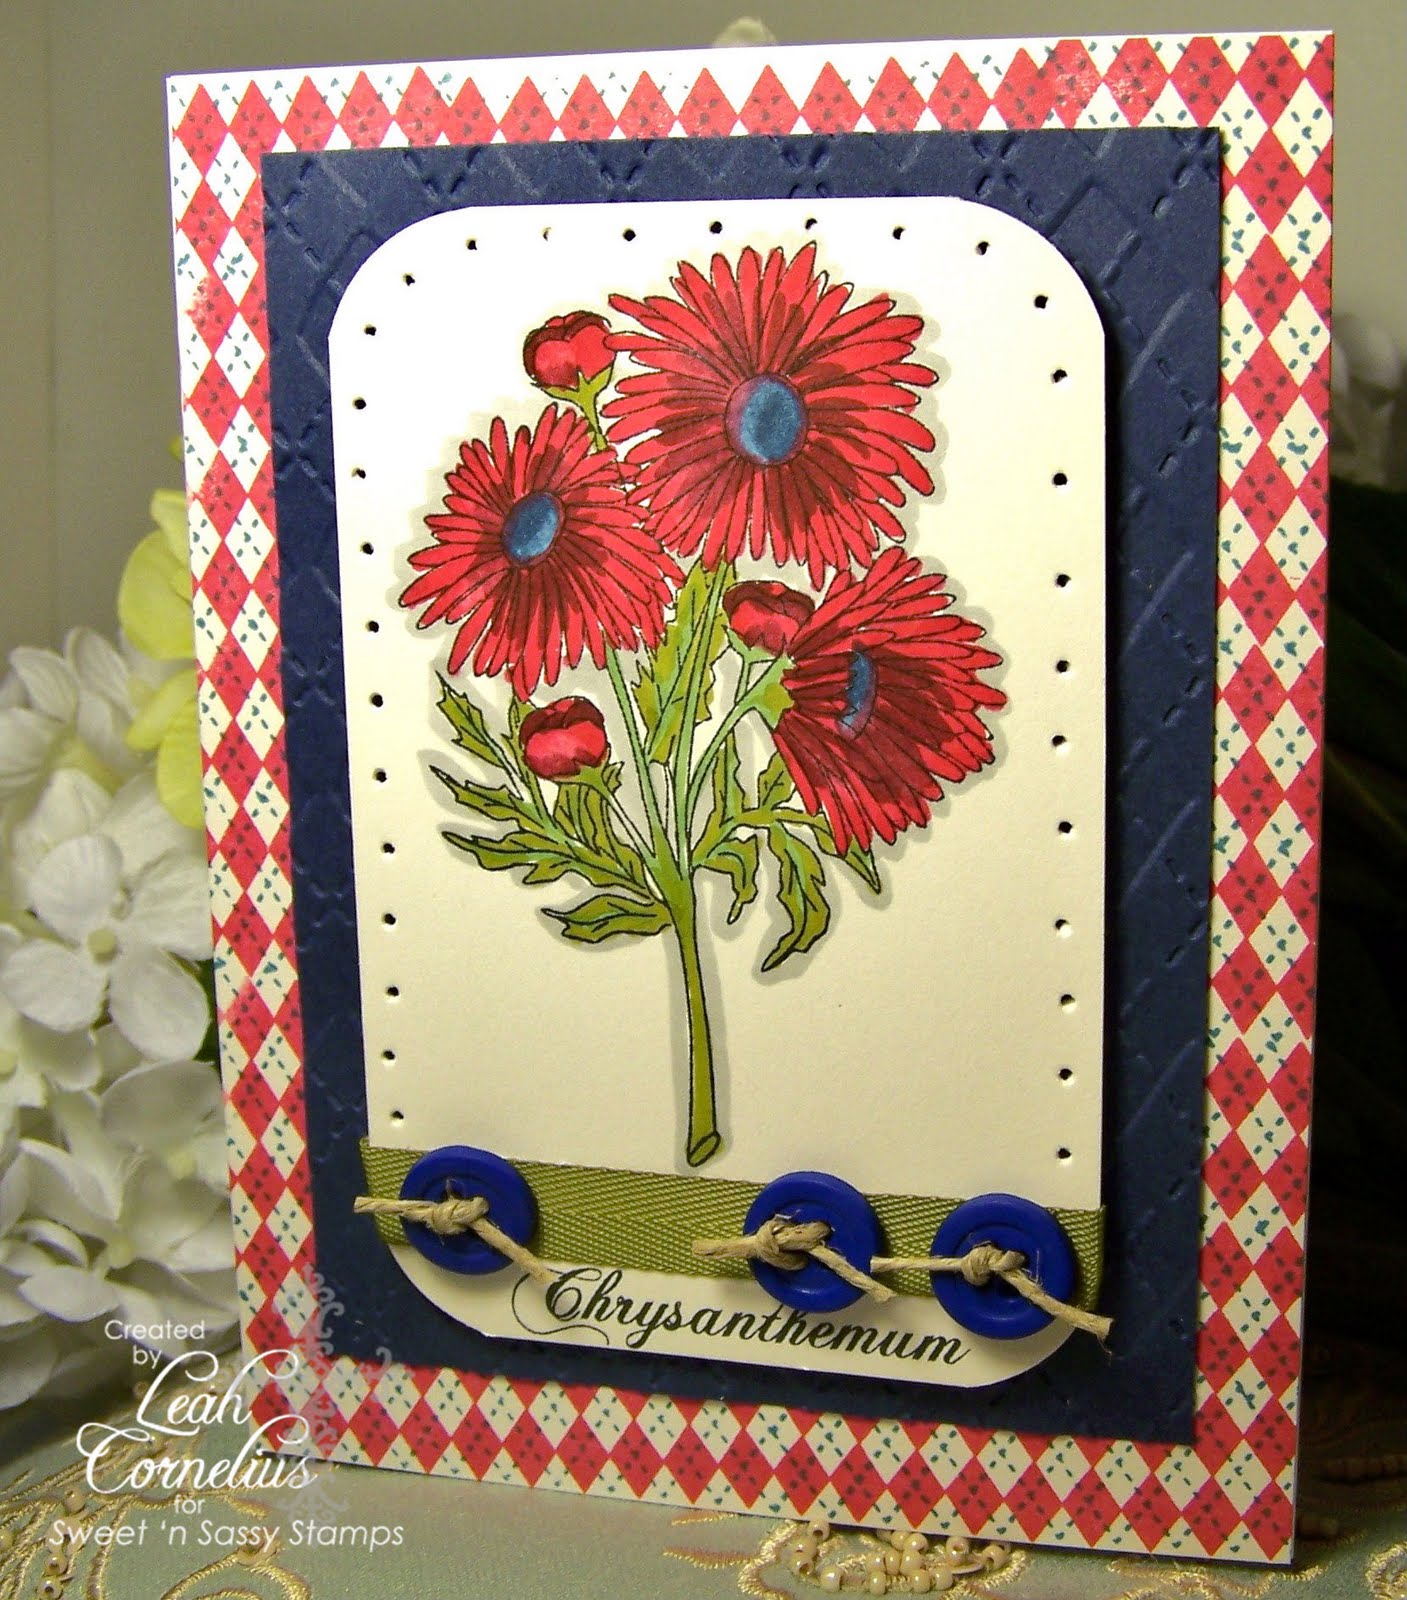 Hello! Today I have a bright, cheery card to share with you using the newly released Chrysanthemums from Sweet 'n Sassy Stamps. Have any of you seen the movie series Anne Of Green Gables? I love those movies...but there is one part where Anne and Gilbert are competeing in a spelling bee and everyone spells Chrysanthemum wrong, except Anne so she wins:) Anyway...I colored my flowers with Copics and did some piercing to frame the image. I hope you are having a good week, God bless!
Tuesday, October 19, 2010
I Lift My Eyes....
 I played along over on the Wplus9 blog with the current Color Cue {9} which are colors picked just for me! LOL The colors this time around are light pink, white and grey/black. I really love these Woodgrain Silhouettes and additions, just so pretty! The sentiment is from a plain Jane from Verve. I hope you like it:) Thanks so much for visiting me, your comments really brighten my day, hugs....
TT#22- Anything Goes!
 Good Tuesday to you! Today's Tuesday Throwdown challenge is....anything!! So you don't have an excuse not to participate:) We are being sponsored by Deedee's Digis and my card features one of her great images called Endless Beginnings. I think this is a lovely sentiment and really ejoyed making this card. I also enjoyed making the pretty flower embellie I used...I've found the key to making the petals really hold their shape is to lightly mist the paper with water as you are working with it and once it dries they won't move:) So head on over the blog and upload your most recent creation! Hugs...
Monday, October 18, 2010
Chalk Popping Technique
 Today I have a technique to share with you called chalk popping. It's a super simple technique that you can achieve many different looks with. For my card I went with a kind of vintage, grungy look:) Let's get started!
 Fist you need to gather your supplies. You'll need a stamp set, I used the gorgeous Wings by Prima set, Pebbles chalk and a Versamark ink pad and any embellishments you want for your card, I chose some pretty Prima trim and rhinestones. All my supplies are available at a great price over at Your Memories Here.
 I first stamped my frame and chalked it in blue, then my bird and chalked the branch frist and then the rest of the bird and then on a seperate piece of cardstock, stamped my flowers, chalked and trimmed them out. To show you the chalking technqiue I am only demonstrating the bird.
 First, you ink up your stamp (make sure it is really clean) with the Versamark ink. Then stamp it onto your cardstock.
 Then pick your first color of chalk and using the applicator apply it to the branch. As you rub the chalk over your stamped image your image will begin to "pop" out from the paper. The Versamark ink adheres the chalk to it.
 Continue on with your bird in your desired color. You can even add more than one color!
 When you are satisfied with the look, lightly swipe over your image with a clean cloth to remove any loose chalk and you now have a lovely chalked image. If you try this technique let us know by leaving a link, we'd love to come see!
Wednesday, October 13, 2010
A Beary Merry Christmas
 I played along over on SCS color challenge this week and even braved the dessert option of adding your own hand written sentiment! This little bear is one of the new releases for this month call Christmas Bear from Sweet 'n Sassy Stamps. I colored him with Copics and added lots of embossing and faux stitching. I sure am getting a good start on my Christmas cards, not like me at all, but hey, I'm sure I'll be happy about it in a month or so! Hugs...
Tuesday, October 12, 2010
TT21- Threes
 Welcome to another Tuesday Throwdown card share:) This week we are sponsored by Catherine Pooler who is a SU! demo. Be sure to order from her if you need any SU! products. My card uses some wonderful SU! paper and stamps and to keep with the "threes" theme I added lots of 3 elements. The green base was stamped with Versamark watermark ink to give my paper a sublte texture using the medallion stamp. Be sure to hop on over and play along with us, you might just win yourself some goodies!
Sunday, October 10, 2010
Precious


I love this picture of my daughter. There is just something so romantic and perfectly sweet about pictures taken from behind the subject. I went all flowery and whimsical on this LO using lots of Prima goodies from the flowers, leaves, die cut flourish paper and pearls. If you haven't checked out the Your Memories Store you should! Lots of fantastic Prima kits available. I added some faux stitching, stamping and used my Cricut to cut the birdcage and title. I hope you are having a good start of your week. Thanks so much for stopping by!
Thursday, October 7, 2010
Poinsettia Greetings
 TGIF! I hope you've had a good week:) My card today uses the newly released Poinsetta December flower from Sweet 'n Sassy Stamps. (illustrated by lil' ole me) I played along this week over on SCS and that's where the LO came from. For my poinsettias I colored them with Copics and Prismacolor pencils and added some highlights with a white gel pen. The pp is from the new BG, Jovial. One more Christmas card off my list! Have a wonderful weekend!
Little Man

I just love the Boys will be Boys cartridge from Scrapbook Pal, so many adorable image perfect for little (or a little bigger) boys! I made this card as a baby card and just loved the cute sentiment and thought that helicopter was super adorable too. Here's how I made it:
Using the Boys will be Boys cartridge cut the helicopter at 3" selecting all the features, without shift, shift and layer, in appropriate colors.
Select and cut sentiment at 1 1/4" in appropriate colors.
Emboss the top layer of the helicopter using the Cuttlebug Polka Dots folder. Add faux stitching.
Adhere all pieces together. Out line the word "little" with Ek Success Millennium .05 black pen to make it pop more.
Adhere all pieces to your card base that is covered with pattterned paper.
Apply glossy accents to the windshield, let dry overnight.
Have a wonderful day!
Wednesday, October 6, 2010
Color Me Happy

 Here are a couple of one layer cards I haven't shared. These are both sets from Flourishes and I sure do love coloring them! The humming bird was colored with Twinkling H2O's, my first time with them, they are very shimmery. My pearl border on the top card was done by individually adhering each pearl with a tiny dot of glue....I do it that way because I buy the pearl alphabets or words because you get so many if you take the pearls off individually...I'm cheap where I can be, what can I say? *LOL* I hope you are having a good week so far....we've been getting rain and it's cold, it's not summer any more :( I am not one of those I love fall people...can't help it, I grew up in Hawaii, it's just not in my blood to get cold. Thanks for stopping by:)
Tuesday, October 5, 2010
TT#20- Chipboard
 This week's Tuesday Throwdown challenge is to use chipboard. You know, I am just not a chipboard kind of girl...now mind you that doesn't mean I don't have a fair stash of it, but I never seem to reach for it. So for my card today I took this chipboard frame, covered it in glitter and it went from there. I stamped my main image ( which is one from CHF ) onto the kraft and colored it with Prismacolor pencils and then used a flourish stamp to stamp a frame around that. I added a bow and a flower I made along with some little rhinestones. Hop on over to the TT blog to join us this week!
Monday, October 4, 2010
Sweet Birthday
 A little birthday card to share today. I chose some super cute Imaginisce All Kinds of Happy paper that is double sided, which makes whipping up a cute card really easy. I die cut the flower with my Cricut, layered it an adhered a Prima gemstone to the middle. Then I added a bit Prima lace trim and a cluster of butterflies to finish it off. I love it when the paper does so much of the work for you:) Be sure to hop on over to the Your Memories Here store, Kristina has got some amazing kits by Prima, so pretty! Thanks for dropping by...hugs.
Saturday, October 2, 2010
World Card Making Day; Card Patterns 84
 Did you get some crafty time today? My post is going up quite late, but thankfully most of my day was locked away in my craft room creating to my heart's content. It felt SO good! This is my last creation for today and I decided to play along over at Card Patterns. I love the sketch and knew exactly what I wanted to do, which doesn't happen all that often, so it was a great way to end a super fun, crafty day. My stamps are from the Flourishes Cherry Blossoms set, such a gorgeous set. Colored the image with Copics and the rest is pretty simple. Oh, the lable was cut with my Cricut using the Lacy Labels cartridge from Walmart, LOVE that cart, has saved me a ton of $$ not buying new Spellbinders ;) Hope you like this one...and thanks so much for taking the time to visit me and comment. Hugs....
Friday, October 1, 2010
Holly Wreath
 Happy Friday! Today Sweet 'n Sassy stamps is releasing 8 fabulous new digi's and I am showing you the Holly Wreath. I colored the image with Copics and then trimmed it out and stamped the sentiment right in the middle of it:) I used some of my brand new BG Jovial paper, tell me you're proud! LOL It's such a gorgeous paper pack and I am determined to actually use it this coming holiday season. The rest is pretty straight forward, some stitching, pearls and ribbon to finish off one more of my Christmas cards. Be sure to hop on over the SNS blog and see what the rest of the DT created. Hugs....
Subscribe to:
Posts (Atom)